A well-configured home network runs quietly in the background, giving every device a fast and reliable connection without you thinking about it. A poorly configured one means dropped video calls, buffering streams, and devices that refuse to connect at the worst moments. This guide walks through everything: choosing the right router, placing it correctly, locking it down, and deciding which devices should stay wired.
Step 1: Understand What You Actually Need
Before buying anything, identify your situation:
Home size: Under 1,000 sq ft – a single router is fine. 1,000-3,000 sq ft – a router with good range or a mesh system. Over 3,000 sq ft or multiple floors – mesh is the right answer.
Internet speed: If your ISP plan is 500 Mbps or faster, make sure your router can handle those speeds on Wi-Fi 6 or Wi-Fi 6E. Older routers cap out around 300-400 Mbps real-world throughput even when rated higher on paper.
Device count: Wi-Fi 6 (802.11ax) handles many simultaneous connections far better than Wi-Fi 5. If you have 15+ devices at home – phones, laptops, smart TVs, thermostats, cameras – Wi-Fi 6 is worth it.
Step 2: Gather Your Equipment
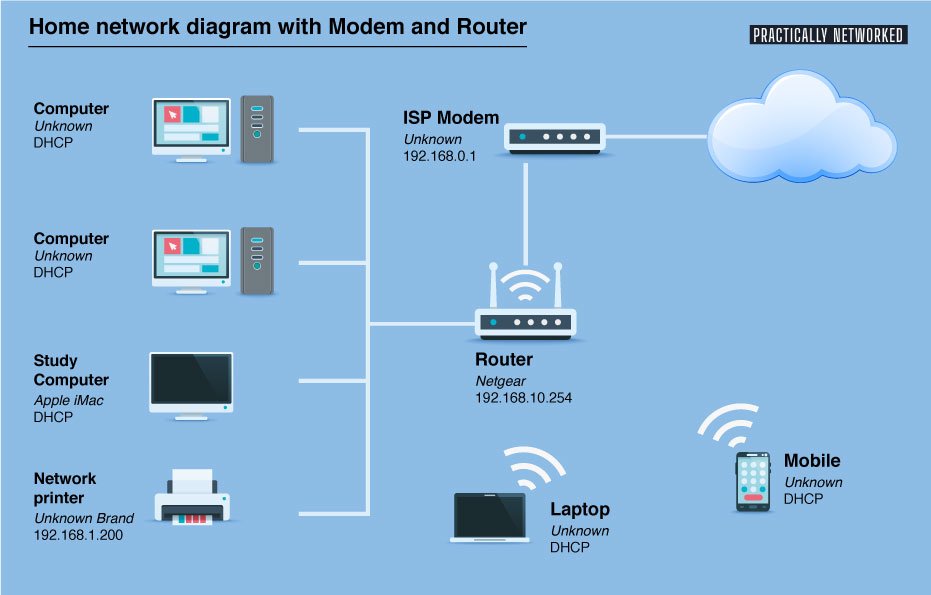
Most home networks need three things:
Modem – converts your ISP’s signal (cable, fiber, DSL) into an Ethernet signal. Your ISP may provide this; if you own your own modem, you avoid the $10-15/month rental fee. Confirm your modem is DOCSIS 3.1 if you have Gigabit cable internet.
Router – distributes the internet connection to all your devices via Wi-Fi and wired Ethernet ports. Many ISPs provide a combined modem/router gateway unit, which is convenient but often performs worse than dedicated hardware.
Ethernet cables – for wired connections to desktops, TVs, and game consoles where you want maximum speed. Cat 6 cables support Gigabit speeds and cost almost nothing.
Step 3: Connect the Hardware
Connect your modem to the coax or phone line from the wall.
Run an Ethernet cable from the modem’s LAN port to the router’s WAN port (usually labeled differently from the LAN ports, often blue or labeled “Internet”).
Power on the modem first, wait 60 seconds, then power on the router.
If you are using a mesh system, set up the primary node connected to the modem first, then add satellite nodes following the manufacturer’s app.
Step 4: Access the Router Admin Panel
Every router has a web-based admin panel accessible from a browser. The default address is usually 192.168.1.1 or 192.168.0.1 – check the label on the bottom of your router. Log in with the default username and password (also on the label or in the manual). The first thing you should do is change these from the factory defaults to something only you know.
Step 5: Configure Your Wi-Fi Networks
SSID (network name): Change it from the default (which often broadcasts your ISP name or router model). Do not include your name or address. Keep it simple.
Password: Use WPA3 security if your router supports it; fall back to WPA2-AES if not. Avoid WPA/TKIP – it is outdated and weak. Make the password at least 12 characters mixing letters and numbers.
2.4 GHz vs 5 GHz: Most modern routers broadcast both bands. 2.4 GHz travels farther through walls but tops out around 150-300 Mbps real-world. 5 GHz is faster (up to 600 Mbps+ on Wi-Fi 6) but shorter range. Let your router decide which band each device uses via Band Steering, or set separate SSIDs if you want manual control. Wi-Fi 6E routers also offer 6 GHz – the fastest and least congested band but only works at close range.
Guest network: Create a separate guest network for visitors and smart home devices. This keeps them isolated from your main network where your computers and NAS drives live. Smart home devices are frequent targets for lateral movement attacks if a device is compromised.
Step 6: Router Placement Matters More Than You Think
Wi-Fi signal drops significantly through walls, floors, and large appliances. Optimal placement:
Centrally located in your home, not tucked in a corner near the ISP entry point
Elevated – on a shelf or table rather than on the floor
Away from microwaves, cordless phones, and baby monitors (2.4 GHz interference sources)
Antennas perpendicular to the floor for horizontal spread; angle one vertically to improve multi-floor coverage
If your ISP forces the modem into an inconvenient location (garage, back corner), run a long Ethernet cable from the modem to a router in a central room. A $15 Cat 6 cable run through a wall or along a baseboard gives you much better coverage than accepting the ISP gateway’s location.
Step 7: Wire Up Devices That Need It
Wi-Fi is convenient but wired Ethernet is always faster, lower latency, and more reliable. Devices that benefit most from a wired connection:
Desktop PCs (gaming, editing workstations)
Smart TVs and streaming boxes (eliminates buffering)
Game consoles (reduces ping in online gaming)
Network-attached storage (NAS) drives
Desktop printers or network printers
If your router only has four LAN ports and you need more wired connections, add an unmanaged Gigabit switch ($20-$30). Connect one Ethernet cable from the router to the switch, then plug up to 8 or 16 additional devices into the switch. This does not create a new network – it extends your existing one.
Step 8: Security Hardening
Beyond a strong Wi-Fi password, take these additional steps:
Change the router admin password to something strong and unique – factory defaults like “admin/admin” are the first thing attackers try
Disable remote management unless you specifically need to access your router from outside your home
Enable automatic firmware updates or check for updates every few months – router firmware patches fix known vulnerabilities
Disable WPS (Wi-Fi Protected Setup) – the PIN-based WPS system has a known brute-force vulnerability
Enable firewall – most routers have a basic SPI firewall enabled by default; confirm it is on in the admin panel
Step 9: Test Your Network
Once everything is set up, verify it is working as expected:
Run a speed test (fast.com or speedtest.net) from a wired device – you should get close to your ISP plan’s advertised speed
Run the same test on Wi-Fi in different rooms to identify dead zones
Check that devices on the guest network cannot ping devices on the main network (verify isolation is working)
When to Consider a Mesh System
If a single router leaves dead zones in your home, a mesh system is the cleanest solution. Systems like the TP-Link Deco XE75 or Eero Pro 6E use multiple nodes that communicate with each other to blanket large homes in consistent Wi-Fi. They are easier to manage than repeaters (which cut bandwidth in half) and provide seamless roaming as you move between rooms.
For most apartments and smaller homes, a good single router placed centrally is all you need. For large homes or tricky layouts with lots of walls, mesh saves a lot of frustration. If you are building a PC to serve as a home server or NAS on this network, our PC build guide covers networking considerations alongside the component recommendations.
iPhone battery draining too fast? These 14 settings changes – from display brightness to background app refresh – can add hours to your day without turning your phone into a brick.
“Storage Almost Full” is one of the most annoying iPhone messages. These 10 methods clear the most space the fastest – from deleting cached app data to offloading apps and managing photos intelligently.
Buying a monitor is harder than it looks – resolution, panel type, refresh rate, and response time all interact with each other and with your specific use case. This guide cuts through the spec sheet to tell you what actually matters.
Your Windows PC does not have to feel sluggish forever. These 12 practical steps can cut boot times and improve everyday performance without spending much.
Screen recording is built into every major operating system – no third-party software needed. This guide covers the built-in tools on Windows, Mac, iPhone, and Android, plus when it is worth using dedicated software instead.
Most home Wi-Fi networks are running with factory settings that any attacker knows by default. These 8 changes – from updating the admin password to enabling WPA3 – close the most common vulnerabilities in under 20 minutes.